Can Not Connect to Rpc Service
Z7_3054ICK0KGTE30AQO5O3KA30N0
hp-concentra-wrapper-portlet
![]() Actions
Actions
HP Deskjet, Officejet, PSC, and Photosmart All-in-Ones and Deskjet Printers - 'Cannot Install this Hardware, the RPC server is unavailable' Message Displays on the Computer in Windows XP During Software Installation or Uninstallation
Issue
While installing or uninstalling the HP software in Windows XP, the error message 'Cannot Install this Hardware, the RPC server is unavailable' displays on the computer.
Figure : 'Cannot Install this Hardware, the RPC server is unavailable' Error Message

Solution
Follow these steps to resolve the issue.
Step one: Determine if the Lexbcserver process is running
-
On the keyboard, press Ctrl, Alt and Delete, and click Task Manager. The Windows Task Manager opens.
-
Click the Processes tab. A list of running processes displays in the Image Name column.
-
Look for a process titled Lexbcserver in the list.
-
If Lexbcserver is listed, continue to the next step.
-
If Lexbcserver is not listed, skip the next step and go directly to Step three: Determine if the SPOOLSV.EXE (Print Spooler) is running.
-
Step two: Disable the Lexbcserver process
-
Click Start, right-click My Computer, and then click Manage. The Computer Management window opens.
Figure : The Computer Management window

-
In the left-hand pane, click the plus sign (+) next to Services and Applications to expand the list.
-
Click Services. A list of services displays in the right-hand pane.
-
In the list of services, right-click Lexbcserver, and then click Properties. The Lexbcserver Properties window opens.
-
From the General tab, look for the Service Status section near the bottom of the window, and then click Stop. The Service Status changes from Started to Stopped.
-
Directly above the Service Status section, find the Startup Type: drop-down menu. From the list, select Disabled.
-
Click OK. The Lexbcserver Properties window closes.
-
On the Computer Management window, click the X in the top-right corner to close it.
Step three: Determine if the Print Spooler (SPOOLSV.EXE) is running
-
On the keyboard, press Ctrl, Alt and Delete, and click Task Manager. The Windows Task Manager opens.
-
Click the Processes tab. A list of running processes displays in the Image Name column.
-
Look for a process called SPOOLSV.EXE in the list.
-
If SPOOLSV.EXE is listed, try to reinstall the HP software. If the issue persists after reinstalling, continue to Step four: Verify the Print Spooler settings and restart the computer.
-
If SPOOLSV.EXE is not listed, continue to Step four: Verify the Print Spooler settings and restart the computer.
-
Step four: Verify the Print Spooler settings and restart the computer
-
Click Start, right-click My Computer, and then click Manage. The Computer Management window opens.
-
In the left-hand pane, click the plus sign (+) next to Services and Applications to expand the list.
-
Click Services. A list of services displays in the right-hand pane.
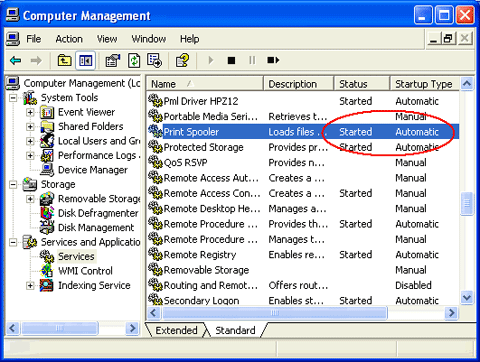
Figure : Print Spooler Service
-
In the list of services, find Print Spooler, and then review the information in the Status and Startup Type columns.
note:
You might have to scroll to the right of the Computer Management window to view these columns.
-
Compare the information in the columns to the following list for further instructions.
-
If the Status is Started and the Startup Type is Automatic, discontinue this procedure and continue to Step five: Verify the System Configuration Utility settings.
-
If the Status is blank or the Startup Type is anything other than Automatic, continue with this procedure.
-
If Print Spooler is not in the list of services, Windows is corrupt and needs to be repaired or reinstalled. Contact Microsoft for assistance.
-
-
Right-click Print Spooler, and then click Properties. The Print Spooler Properties window opens.
-
From the General tab, select Automatic from the Startup type: drop-down list.
-
In the Service status: section, click Start.
-
Click OK. The Print Spooler Properties window closes.
-
On the Computer Management window, click the X in the top-right corner to close it.
Step five: Verify the System Configuration Utility settings
-
Click Start, and then click Run. The Run dialog box opens.
-
Type msconfig in the Open: field, and then click OK. The System Configuration Utility window opens.
-
From the General tab, look at the information under Startup Selection, and then review the following list for further instructions.
-
If Normal Startup is selected, continue with this procedure.
-
If Selective Startup is selected, select Load System Services if it is not already selected, and then continue with this procedure.
-
-
Click OK, and then restart the computer.
-
When the computer restarts, try to install the HP software again. If the issue persists, continue to the next step.
Step six: Run the Windows File Checker Utility
-
Click Start, and then click Run. The Run dialog box opens.
-
Type sfc /scannow in the Open: field, and then click OK.
-
If you are prompted to insert the Windows disk, insert the CD and click Retry.
-
Follow the on-screen instructions , and then restart the computer when prompted.
-
When the computer restarts, try to install the HP software again. If the issue persists, continue to the next step.
Step seven: Backup the Windows Registry
-
Disconnect the USB cable from the back of the product.
-
Uninstall any other printers connected to the computer, and then restart the computer.
note:
For assistance uninstalling other printers, contact the printer manufacturer.
-
Click Start, and then click Run. The Run dialog box opens.
-
Type regedit in the Open: field, and then click OK. The Registry Editor window opens.
Figure : The Registry Editor

-
In the left-hand pane, find My Computer at the top of the list. If it is not already selected, click to select it.
-
With My Computer selected, click File, and then click Export. The Export Registry File window opens.
-
Under Export Range, select All.
-
Browse to a location to save the file, and then type a name in the File Name: field. Use a file name that will be easy to remember, such as "Windows_Registry_Backup" and today's date.
-
Click Save. The Export Registry File window closes, but the Registry Editor remains open. Do not close the Registry Editor.
Step eight: Edit the Windows Registry
caution:Follow these steps exactly as listed. If the steps are not followed exactly, Windows may not function correctly afterward.
-
From the Registry Editor, follow these steps to locate the registry key titled HKEY_LOCAL_MACHINE\System\CurrentControlSet\Control\Print\Environments\Windows NT x86\Drivers:
-
Under My Computer, click the plus sign (+) next to HKEY_LOCAL_MACHINE to expand the list.
-
Find and click System, and then click the plus sign (+) to expand the list.
-
Find and click CurrentControlSet, and then click the plus sign (+) to expand the list.
-
Find and click Control, and then click the plus sign (+) to expand the list.
-
Find and click Print, and then click the plus sign (+) to expand the list.
-
Find and click Environments, and then click the plus sign (+) to expand the list.
-
Find and click Windows NT x86, and then click the plus sign (+) to expand the list.
-
Find and click Drivers, and then click the plus sign (+) to expand the list.
-
-
Click the plus sign (+) next to any Version-X subkeys (where X is a number). For example, if a folder titled Version-3 exists under the Drivers folders, click the plus sign (+) to expand the list.
-
Under Version-X entries, right-click any references to printers that were previously installed on the computer, and then click Delete.
caution:
Do not remove any software references, such as Adobe PDF Distiller or Active Touch Document Loader. Do not remove any current printers that are installed on the computer. Only remove previously installed printers that are not currently installed.
-
Click Yes to confirm deletion of the key.
-
Repeat steps 2-4 until all references to printers that were previously installed on the computer are deleted.
-
From the Registry Editor, follow these steps to locate the registry key titled HKEY_LOCAL_MACHINE\System\CurrentControlSet\Control\Print\Monitors :
-
Under My Computer, click the plus sign (+) next to HKEY_LOCAL_MACHINE to expand the list.
-
Find and click System, and then click the plus sign (+) to expand the list.
-
Find and click CurrentControlSet, and then click the plus sign (+) to expand the list.
-
Find and click Control, and then click the plus sign (+) to expand the list.
-
Find and click Print, and then click the plus sign (+) to expand the list.
-
Find and click Monitors, and then click the plus sign (+) to expand the list.
A list of several print monitors installed on the computer appears. The following are the default print monitors for the standard ports:
-
BJ Language Monitor
-
Local Port
-
PJL Language Monitor
-
Standard TCP/IP Port
-
USB Monitor
-
LPR Port
-
-
-
Right click any monitor subkeys other than those listed in the preceding list, and then click Delete.
caution:
Do not delete any of the default print monitors in the preceding list. Only delete any other monitor subkeys listed.
-
Click Yes to confirm deletion of the key.
-
Find and click the following registry key:
HKEY_LOCAL_MACHINE\System\CurrentControlSet\Services.
-
Under My Computer, click the plus sign (+) next to HKEY_LOCAL_MACHINE to expand the list.
-
Find and click System, and then click the plus sign (+) to expand the list.
-
Find and click CurrentControlSet, and then click the plus sign (+) to expand the list.
-
Find and click Services, and then click the plus sign (+) to expand the list.
-
-
Click Spooler in the list of services to highlight the registry key. A list of data strings displays in the right-hand pane.
-
In the right-hand pane, look for data strings that begin with DependOnService.
Figure : DependOnService data string

-
Look under the Data column of the DependOnService string, and then review the following information for further instructions.
-
If lexbces is present in the Data column, right-click DependOnService, and then click Modify. Delete lexbces, type RPCSS in its place, and then click OK. Continue with this procedure.
-
If the data field contains any other values, such as RPCSS, continue with this procedure.
-
-
Close the registry editor, and then restart the computer and try installing the HP software again.
Cause
The Remote Procedure Call (RPC) server is a service in Windows XP that is used to validate and start other services within the system, such as the print spooler that is needed to install the print drivers. This error will occur if the spooler is disabled or corrupted, or if another print driver is not permitting access to the print spooler.
Can Not Connect to Rpc Service
Source: https://support.hp.com/in-en/document/c01394647
0 Response to "Can Not Connect to Rpc Service"
Post a Comment